Unity Build Pipeline
This sample demonstrates how to deploy a complete Unity build pipeline on AWS using the Cloud Game Development Toolkit. This configuration is designed for production Unity game development workflows and includes version control, CI/CD, asset acceleration, license management, and artifact storage.
Architecture Overview
This Unity build pipeline consists of the following components:
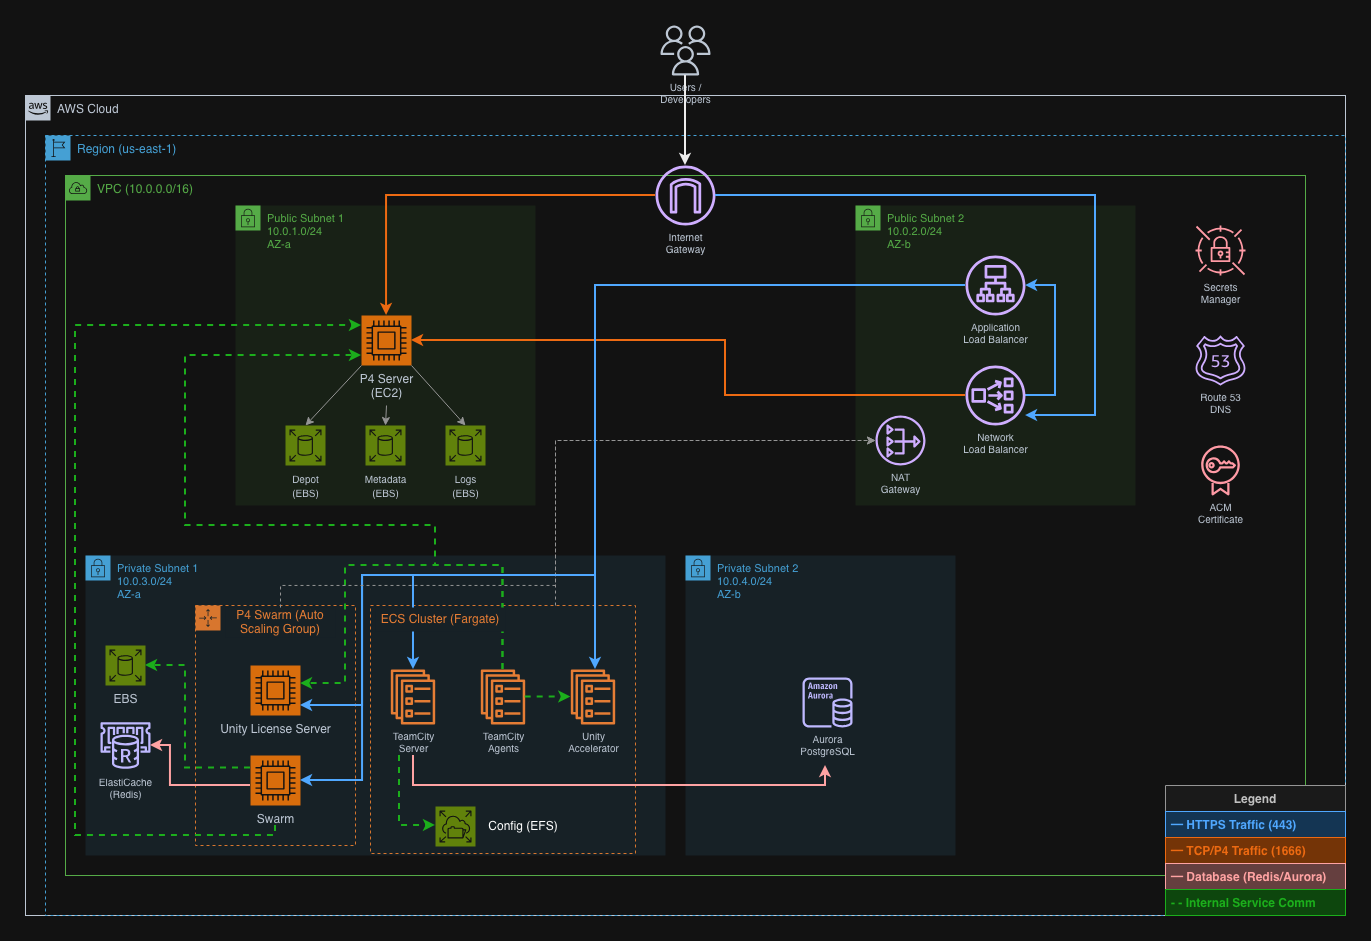
Components
- Perforce (Version Control)
- P4 Server (Helix Core) for source code management
- P4 Swarm (Code Review) for peer code reviews
-
Deployed on EC2 with Auto Scaling Group (P4 Swarm) and persistent EBS storage
-
TeamCity (CI/CD)
- TeamCity Server for build orchestration
- Auto-scaling build agents on Fargate
-
Integration with Perforce for source control
-
Unity Accelerator
- Caches Unity Library folder artifacts
- Reduces import times for distributed teams
-
Deployed on ECS with persistent storage
-
Unity Floating License Server
- Manages Unity Pro/Enterprise licenses
- Supports concurrent license checkout
-
Deployed on EC2 with stable network identity (ENI)
-
S3 Artifacts Bucket
- Stores build outputs (executables, asset bundles)
- Lifecycle policies for cost optimization
- Versioning enabled for rollback capability
Features
- Complete CI/CD Pipeline: From code commit to build artifact
- Version Control: Enterprise-grade Perforce deployment
- Build Acceleration: Unity Accelerator for faster iteration
- License Management: Floating license server for team collaboration
- Secure Access: HTTPS everywhere with SSL/TLS certificates
- DNS Integration: Custom domain names for all services
- High Availability: Multi-AZ deployments where applicable
- Cost Optimized: Auto-scaling and right-sized resources
Prerequisites
Before deploying this pipeline, ensure you have:
- Tools Installed
- Terraform CLI (>= 1.0)
- Packer CLI (for AMI creation)
-
AWS Account
- AWS account with appropriate permissions
- AWS CLI configured with credentials
-
Sufficient service quotas for ECS, EC2, and RDS
-
Domain and DNS
- Route53 hosted zone for your domain
-
Ability to validate SSL certificates via DNS
-
Unity Licensing
- Unity Pro or Enterprise license with floating license entitlement
- Unity Floating License Server binaries (download from https://id.unity.com/)
- Valid
services-config.jsonlicense file from Unity
Deployment Guide
Phase 1: Predeployment
Step 1: Create Perforce Server AMI
The Perforce module requires a custom AMI with Perforce Helix Core pre-installed.
Important: If building on Windows, use WSL or a Unix-based system to avoid line ending issues with shell scripts.
# Navigate to the Packer template directory
cd assets/packer/perforce/p4-server

# Initialize Packer
packer init perforce_x86.pkr.hcl

# Build the AMI (this will use your default AWS region)
packer build perforce_x86.pkr.hcl
Take note of the AMI ID from the output.
Verify the AMI was created successfully:
# Verify the AMI is available in your account
aws ec2 describe-images \
  --owners self \
  --filters "Name=name,Values=p4_al2023*" \
  --query 'Images[0].[ImageId,Name,CreationDate]' \
  --output table
The Terraform configuration will automatically discover this AMI by searching for images with the name pattern p4_al2023* owned by your account.
Note: The AMI must be created in the same AWS region where you plan to deploy the pipeline.
Step 2: Create Route53 Hosted Zone
This pipeline requires a Route53 hosted zone for DNS records and SSL certificate validation.
Option A: Register a new domain with Route53
- Follow the Route53 domain registration guide
- A hosted zone is automatically created
Option B: Use an existing domain
- Follow the guide to make Route53 the DNS service
- Create a hosted zone for your domain
Your services will be accessible at subdomains:
perforce.yourdomain.com- Perforce serverswarm.yourdomain.com- P4 Swarm (Code Review)teamcity.yourdomain.com- TeamCity serverunity-accelerator.yourdomain.com- Unity Acceleratorunity-license.yourdomain.com- Unity License Server
Step 3: Download Unity License Server Binaries
Download the Unity Floating License Server installer:
- Log in to https://id.unity.com/
- Navigate to "Organizations" → Select your organization → "Subscriptions"
- Download the Linux version of the Unity Floating License Server (e.g.,
Unity.Licensing.Server.linux-x64-v2.1.0.zip) - Save the file to a known location on your machine - you'll reference this path in
terraform.tfvars
Important - License Server Binding: The Unity License Server binds itself to the machine's identity on first startup, including: MAC address, operating system, number of processor cores, and server name.
This module uses an Elastic Network Interface (ENI) to provide a stable MAC address, and enables EC2 termination protection by default. However, if the EC2 instance is destroyed and recreated (not just stopped/started), you will need to contact Unity Support to revoke the old registration before deploying a new one. This process can take several days.
To protect against accidental deletion, consider adding
prevent_destroylifecycle rules after initial deployment (see Phase 3, Step 5).
Step 4: Build Unity TeamCity Agent Docker Image
Critical: This step must be completed BEFORE running
terraform apply. The TeamCity agent deployment requires a valid Docker image URI.
The sample includes a Dockerfile for building a Unity TeamCity build agent. This image combines Unity Editor, TeamCity agent runtime, and necessary tools (Perforce P4 CLI, AWS CLI, Git).
Quick build steps:
# Navigate to the Docker directory
cd docker/teamcity-unity-build-agent/

# Step 1: Create ECR repository
aws ecr create-repository --repository-name unity-teamcity-agent --region us-east-1

# Step 2: Log in to ECR
aws ecr get-login-password --region us-east-1 | \
  docker login --username AWS --password-stdin $(aws sts get-caller-identity --query Account --output text).dkr.ecr.us-east-1.amazonaws.com

# Step 3: Build the image (takes 15-30 minutes)
docker build \
  --build-arg UNITY_VERSION=6000.0.23f1 \
  --build-arg UNITY_CHANGESET=bd20d88e54b8 \
  -t unity-teamcity-agent:latest \
  .

# Step 4: Tag and push to ECR
docker tag unity-teamcity-agent:latest \
  $(aws sts get-caller-identity --query Account --output text).dkr.ecr.us-east-1.amazonaws.com/unity-teamcity-agent:latest

docker push $(aws sts get-caller-identity --query Account --output text).dkr.ecr.us-east-1.amazonaws.com/unity-teamcity-agent:latest

# Step 5: Get your image URI for terraform.tfvars
echo "$(aws sts get-caller-identity --query Account --output text).dkr.ecr.us-east-1.amazonaws.com/unity-teamcity-agent:latest"
Copy the image URI from the output - you'll need it for your terraform.tfvars file in the next phase.
Note: For detailed instructions including how to find Unity version/changeset information and building different Unity versions, see the comprehensive guide in
docker/README.md.
Phase 2: Deployment
Step 1: Configure Variables
Navigate to the unity-build-pipeline directory and create your terraform.tfvars file from the example:
cd samples/unity-build-pipeline
cp terraform.tfvars.example terraform.tfvars
Edit terraform.tfvars with your values:
# Your Route53 hosted zone domain name
route53_public_hosted_zone_name = "yourdomain.com"

# Path to Unity License Server zip file (from Phase 1, Step 3)
unity_license_server_file_path = "/path/to/Unity.Licensing.Server.linux-x64-v2.1.0.zip"

# Unity TeamCity agent Docker image URI (from Phase 1, Step 4)
unity_teamcity_agent_image = "123456789012.dkr.ecr.us-east-1.amazonaws.com/unity-teamcity-agent:latest"
Step 2: Review and Customize locals.tf (optional)
Note that the values in locals.tf are sensible defaults and will work without changes. The option to change them is there for those who want to further customize the deployment.
Edit locals.tf to customize:
- Project prefix:
project_prefix = "ubp"- used as a prefix for resource names - Subdomain names: Change service subdomains (e.g.,
perforce_subdomain = "p4") - VPC CIDR blocks: Adjust network ranges if needed to avoid conflicts with existing networks
- Tags: Add or modify resource tags for cost tracking or organization
Step 3: Initialize Terraform
terraform init
This downloads required providers and modules.
Step 4: Deploy the Pipeline
# Review the planned changes
terraform plan

# Apply the configuration
terraform apply
The deployment takes approximately 15-20 minutes. Terraform will:
- Create VPC and networking infrastructure
- Deploy Perforce with P4 Server and P4 Swarm (Code Review)
- Deploy TeamCity server and agents
- Deploy Unity Accelerator and License Server
- Create S3 bucket for artifacts
- Configure DNS records and SSL certificates
Step 5: Verify Deployment
After terraform apply completes, verify all services deployed successfully:
# View all Terraform outputs
terraform output

# Check ECS services are running
aws ecs list-services --cluster $(terraform output -raw ecs_cluster_name) | jq

# Verify ECS service health
aws ecs describe-services \
  --cluster $(terraform output -raw ecs_cluster_name) \
  --services $(aws ecs list-services --cluster $(terraform output -raw ecs_cluster_name) --query 'serviceArns[*]' --output text) \
  --query 'services[*].[serviceName,status,runningCount,desiredCount]' \
  --output table

# Test DNS resolution for your services
nslookup perforce.yourdomain.com
nslookup swarm.yourdomain.com
nslookup teamcity.yourdomain.com
nslookup unity-accelerator.yourdomain.com
nslookup unity-license.yourdomain.com
All services should show ACTIVE status with runningCount matching desiredCount.
Phase 3: Postdeployment
Understanding Security Group Access
This sample automatically configures security group rules to allow access from your current IP address (detected at deployment time) to all web services. The rules are defined in security.tf and grant access to:
- Perforce (P4 Server): Ports 1666 (P4 protocol) and 443 (HTTPS)
- TeamCity: Port 443 (HTTPS)
- Unity Accelerator: Port 443 (HTTPS)
- Unity License Server: Ports 443 (HTTPS) and 8080 (HTTP)
If your IP address changes or you need to grant access to additional users/IP ranges, update the security group rules in security.tf or add rules directly in the AWS Console.
To add access for additional IP addresses, you can either:
- Modify
security.tfand runterraform apply - Use AWS Console to add ingress rules to the relevant security groups (find them using
terraform output)
Note: Each module exposes its ALB security group ID as an output (e.g.,
module.teamcity.alb_security_group_id), allowing you to attach custom ingress rules.
Step 1: Configure Perforce (P4 Server)
This section walks you through the initial Perforce setup, creating your first depot, stream, and workspace.
Step 1.1: Retrieve Administrator Credentials
# Get the Perforce super user username
aws secretsmanager get-secret-value \
  --secret-id $(terraform output -raw perforce_super_user_username_secret_arn) \
  --query SecretString \
  --output text

# Get the Perforce super user password
aws secretsmanager get-secret-value \
  --secret-id $(terraform output -raw perforce_super_user_password_secret_arn) \
  --query SecretString \
  --output text
Step 1.2: Initial Connection and Login
# Set your P4PORT environment variable
export P4PORT=$(terraform output -raw p4_server_connection_string)

# Set your P4USER to the super user
export P4USER=<username-from-above>

# Login with super user credentials (enter password when prompted)
p4 login

# Verify connection
p4 info
Step 1.3: Create a Stream Depot
Stream depots are recommended for modern Perforce workflows and work well with Unity projects.
# Create a new stream depot named "game"
p4 depot -t stream -o game | p4 depot -i

# Verify the depot was created
p4 depots
Step 1.4: Create a Mainline Stream
# Create the mainline stream
p4 stream -t mainline -o //game/main | p4 stream -i

# Verify the stream was created
p4 streams //game/...
Step 1.5: Create a Workspace and Submit Initial Files
# Create a workspace mapped to the mainline stream
p4 client -o -S //game/main | p4 client -i

# Get the workspace name (usually <username>_<hostname>)
p4 client -o | grep '^Client:'

# Sync the workspace (will be empty initially)
p4 sync

# Navigate to your workspace root
cd ~/perforce/<workspace-name>/

# Create a README file
echo "# Unity Game Project" > README.md

# Add the file to Perforce
p4 add README.md

# Submit the changelist
p4 submit -d "Initial commit: Add README"

# Verify the file was submitted
p4 files //game/main/...
Step 1.6: Create Additional Users
# Create a new user (replace 'developer1')
p4 user -o developer1 | p4 user -i -f

# Set a password for the new user
p4 passwd developer1

# Grant appropriate permissions (optional: edit protections table)
p4 protect
Your Perforce server is now ready for your team to use. Users can connect using P4V or P4 CLI with the connection string from terraform output p4_server_connection_string.
Step 2: Configure P4 Swarm (Code Review)
P4 Swarm provides web-based code review for your Perforce projects. It automatically connects to your P4 Server and configures itself on first access.
Step 2.1: Initial Access
Visit https://swarm.yourdomain.com in your browser. On first access, Swarm will:
- Automatically connect to the P4 Server
- Install required triggers on the P4 Server
- Complete initial setup
Step 2.2: Log In
Log in with your Perforce credentials (the same username/password you use for P4V or P4 CLI). The super user credentials can be retrieved with:
# Get Perforce super user credentials
aws secretsmanager get-secret-value \
  --secret-id $(terraform output -raw perforce_super_user_username_secret_arn) \
  --query SecretString --output text

aws secretsmanager get-secret-value \
  --secret-id $(terraform output -raw perforce_super_user_password_secret_arn) \
  --query SecretString --output text
Step 2.3: Verify Setup
Once logged in:
- Navigate to the Projects page - you should see your Perforce depot(s)
- Create a test review to verify functionality:
- Make a shelved changelist in Perforce
- In Swarm, create a review from the shelved changelist
- Add reviewers and verify email notifications work
Your team can now use Swarm for code reviews before submitting changes to mainline!
Step 3: Configure TeamCity
TeamCity is deployed with an Aurora Serverless PostgreSQL database that is automatically configured via environment variables.
Step 3.1: Complete Initial Setup Wizard
-
Visit
https://teamcity.yourdomain.com -
On first access, TeamCity will display the setup wizard. Follow the prompts:
- Data Directory: Pre-configured, click "Proceed"
- Database Connection: Automatically configured, click "Proceed"
- License Agreement: Accept the JetBrains agreement
-
Create Administrator Account: Set up your admin user credentials
-
TeamCity will initialize the database and complete setup (takes 2-3 minutes)
Step 3.2: Authorize Build Agents
The Unity build agents you deployed will automatically register with the TeamCity server but require authorization.
- Navigate to Agents → Unauthorized
- You should see your Unity build agents listed (e.g.,
unity-builder-xxxx) - Click on each agent and click Authorize
- (Optional) Assign agents to specific agent pools based on your build requirements
The agents are now ready to accept build jobs.
Step 3.3: Configure Perforce VCS Root
To connect TeamCity to your Perforce server:
- Navigate to Administration → VCS Roots
- Click Create VCS Root
- Select Perforce as the VCS type
- Configure the connection:
- VCS root name:
Perforce Main - Port:
ssl:perforce.yourdomain.com:1666 - Stream:
//game/main(or your depot/stream path) - Authentication: Enter Perforce username and password
- Click Test Connection to verify
- Click Create
Your TeamCity server is now connected to Perforce and ready to run builds.
Step 4: Configure Unity Accelerator
Access Unity Accelerator Dashboard:
- Get the dashboard credentials:
# Get username
aws secretsmanager get-secret-value \
  --secret-id $(terraform output -raw unity_accelerator_dashboard_username_secret_arn) \
  --query SecretString --output text

# Get password
aws secretsmanager get-secret-value \
  --secret-id $(terraform output -raw unity_accelerator_dashboard_password_secret_arn) \
  --query SecretString --output text
- Log in to the dashboard:
- Visit
https://unity-accelerator.yourdomain.com - Enter the username and password from above
- Review cache statistics and configuration
Configure Unity Editor to Use Accelerator:
In Unity Editor preferences:
- Go to Preferences → Asset Pipeline → Cache Server
- Set mode to "Remote"
- Enter IP:
unity-accelerator.yourdomain.com - Port:
10080 - Enable "Download" and "Upload"
The Accelerator will cache Unity Library folder artifacts and dramatically reduce import times for your team.
Step 5: Configure Unity License Server
The Unity Floating License Server requires a multi-step registration process with Unity to activate your floating licenses.
Step 5.1: Download Server Registration Request
After deployment, the license server creates a registration request file containing the server's machine binding information.
# Download the server registration request file
wget $(terraform output -raw unity_license_server_registration_request_url) \
  -O server-registration-request.xml
Note: This presigned URL is valid for 1 hour. If expired, regenerate with
terraform refresh.
Step 5.2: Register Server with Unity
- Log in to https://id.unity.com/
- Navigate to "Organizations" → Select your organization → "Subscriptions"
- Upload the
server-registration-request.xmlfile - Download the licenses zip file Unity provides (e.g.,
Unity_v2024.x_Linux.zip)
Important: Do not rename the licenses zip file - Unity expects the original filename.
Step 5.3: Upload Licenses to S3
# Upload licenses zip (replace with your actual filename)
aws s3 cp Unity_v2024.x_Linux.zip \
  s3://$(terraform output -raw unity_license_server_s3_bucket)/
The license server monitors this bucket and will automatically import licenses within 60 seconds.
Step 5.4: Verify License Import
# Get dashboard URL and password
echo $(terraform output -raw unity_license_server_url)

aws secretsmanager get-secret-value \
  --secret-id $(terraform output -raw unity_license_server_dashboard_password_secret_arn) \
  --query SecretString --output text
Visit the dashboard URL and log in with username admin and the password from above. Verify your licenses appear with status "Available".
Step 5.5: Configure Client Access to License Server
Unity clients require a services-config.json file to connect to the license server.
# Download services-config.json
wget $(terraform output -raw unity_license_server_services_config_url) \
  -O services-config.json
For TeamCity build agents (Docker containers):
The agents in this sample run as Docker containers in ECS. To add the services-config.json:
- Option A: Add to Docker image (recommended)
Edit docker/teamcity-unity-build-agent/Dockerfile to copy the file during build:
COPY services-config.json /usr/share/unity3d/config/services-config.json
Then rebuild and push your Docker image.
- Option B: Download at runtime
Modify your container's entrypoint script to download from S3 on startup.
For developer workstations:
Deploy services-config.json to:
- Windows:
%PROGRAMDATA%\Unity\config\services-config.json - Linux:
/usr/share/unity3d/config/services-config.json - macOS:
/Library/Application Support/Unity/config/services-config.json
Without this file in the correct location, Unity will not be able to connect to the license server.
Step 5.6: Protect License Server from Accidental Deletion (CRITICAL)
Critical: The Unity License Server binds to its machine's MAC address. If the EC2 instance is destroyed, you must contact Unity Support to revoke the registration before deploying a new server. Unity Support response can take up to 48 hours, during which your team will not have access to Unity licenses.
Terraform does not respect EC2 termination protection. Even though the module enables instance termination protection by default, running terraform destroy will still destroy the instance. You must add a Terraform lifecycle block to prevent deletion.
Edit main.tf and add the lifecycle block to the Unity License Server module:
module "unity_license_server" {
  count  = var.unity_license_server_file_path != null ? 1 : 0
  source = "../../modules/unity/floating-license-server"

  # ... existing configuration ...

  lifecycle {
    prevent_destroy = true
  }
}
Apply the change:
terraform apply
With this protection in place, terraform destroy will fail if it tries to destroy the license server, preventing accidental deletion. To intentionally destroy the license server later, you must first remove this lifecycle block.
Step 6: Create Your First Build Configuration
This section walks through creating a Unity build configuration in TeamCity.
Step 6.1: Create a TeamCity Project
- In TeamCity, click Administration → Projects
- Click Create project
- Select Manually
- Enter:
- Name:
Unity Game Project - Project ID:
UnityGameProject(auto-generated) - Click Create
Step 6.2: Create a Build Configuration
- Inside your new project, click Create build configuration
- Enter:
- Name:
Build Android - Build configuration ID:
BuildAndroid(auto-generated) - Click Create
Step 6.3: Attach VCS Root
- Click VCS Roots in the left sidebar
- Click Attach VCS root
- Select the Perforce VCS root you created in Step 3.3
- Click Attach
Step 6.4: Add Build Steps
- Click Build Steps in the left sidebar
- Click Add build step
- Select Command Line as the runner type
- Configure:
- Step name:
Unity Build - Run:
Custom script -
Custom script:
# Unity build command /opt/unity/Editor/Unity \ -quit \ -batchmode \ -nographics \ -projectPath . \ -buildTarget Android \ -logFile - \ -executeMethod BuildScript.Build -
Click Save
Note: The
-executeMethod BuildScript.Buildassumes you have a static method in your Unity project atAssets/Editor/BuildScript.cs. You'll need to create this script in your Unity project to define the build logic.
Step 6.5: (Optional) Add Artifact Upload to S3
- Click Add build step
- Select Command Line
- Configure:
- Step name:
Upload to S3 -
Custom script:
aws s3 cp build/ s3://YOUR_BUCKET_NAME/builds/%build.number%/ --recursive -
Replace
YOUR_BUCKET_NAMEwith your artifacts bucket (or use a TeamCity parameter) -
Click Save
Step 6.6: Configure Build Triggers (Optional)
- Click Triggers in the left sidebar
- Click Add new trigger
- Select VCS Trigger
- Configure to trigger on every Perforce commit
- Click Save
Your build configuration is ready!
Step 7: Verify End-to-End Pipeline
Test that the entire pipeline works:
- Commit a Unity project to Perforce (if you haven't already)
- Trigger a build in TeamCity (Run → Run Build)
- Monitor the build log and verify:
- Perforce syncs successfully
- Unity license is checked out
- Unity build completes
- Build finishes with success status
If the build completes successfully, your Unity build pipeline is fully operational!
Architecture Details
Networking
VPC (10.0.0.0/16)
├── Public Subnets (10.0.1.0/24, 10.0.2.0/24)
│   └── NAT Gateways, Load Balancers
├── Private Subnets (10.0.3.0/24, 10.0.4.0/24)
│   └── ECS Services, RDS, Build Agents
└── DNS
    └── Private Route53 zone for internal service discovery
Security
- Encryption: All data encrypted at rest and in transit
- Network Isolation: Services deployed in private subnets
- Security Groups: Least privilege access between services
- Secrets Management: Credentials stored in AWS Secrets Manager
- HTTPS: All public endpoints use TLS 1.2+
- IAM Roles: Task-specific roles with minimal permissions
High Availability
- Multi-AZ: RDS and load balancers span availability zones
- Auto Scaling: TeamCity agents scale based on queue depth
- Health Checks: Load balancer health checks for all services
- Backup: Automated RDS snapshots for Perforce metadata
- Storage: EBS volumes with snapshots for critical data
Cost Optimization
- Right-Sizing: Instance types optimized for workload
- Auto Scaling: Agents scale down when idle
- S3 Lifecycle: Artifacts transition to cheaper storage tiers
- Spot Instances: Optional for TeamCity build agents
- Scheduling: Can stop/start non-critical services outside work hours
Build Agent Storage Strategies
TeamCity build agents need access to source code and Unity assets. This sample uses ephemeral storage by default, but larger studios should consider persistent storage for performance.
Ephemeral Storage (Current Default)
How it works: Each agent gets 50GB that's wiped when the container stops. Every new agent downloads the full repository and re-imports all Unity assets.
Best for: Small teams, infrequent builds, demos Cost: $0/month Build overhead: 5-15 minutes per build (full P4 sync + Unity import)
EFS Persistent Storage
How it works: Mount a shared EFS volume to /opt/buildAgent/work. TeamCity creates a unique working directory per agent (hash-based naming like a54a2cadb9b4d269). Each agent maintains its own Perforce workspace and Unity Library cache on EFS, persisting across container restarts.
Storage pattern: With 5 agents, you'll have 5 separate directories on EFS, each containing a full P4 workspace + Unity cache. Total storage = (project size + Unity cache) × number of agents.
Setup:
- Create EFS file system in your VPC
- Mount EFS to
/opt/buildAgent/workin agent task definition - TeamCity automatically isolates each agent to its own subdirectory
- First build per agent syncs fully; subsequent builds sync incrementally
Best for: Medium teams (10-50 devs), frequent builds Cost: ~$5-30/month (15-100GB per agent × agent count) Build overhead: 30 seconds - 2 minutes (incremental sync + Unity cache reuse)
NetApp ONTAP FlexClone
How it works: Run a scheduled job (Lambda/ECS task) that maintains a "golden" FlexVol on FSx for NetApp ONTAP—fully synced to latest Perforce changelist with Unity Library pre-imported. When a build starts, create an instant FlexClone (writable snapshot) and attach it to the agent. Agent works on the clone in isolation. After the build, delete the clone.
Storage pattern: One golden volume (repository + Unity cache) + thin clones for active builds. 100GB repo with 10 parallel builds = 100GB parent + ~10GB deltas (not 1TB).
Setup:
- Deploy FSx for NetApp ONTAP in your VPC
- Create golden volume update automation (nightly or on-demand)
- Integrate TeamCity with NetApp API to create/destroy clones per build
- Mount clone as
/opt/buildAgent/workwhen agent starts
Update strategy: Golden volume updates on schedule (e.g., nightly) or triggered by significant P4 changes. Builds use snapshot from last update, plus incremental P4 sync for any new changes.
Best for: Large teams (50+ devs), high build frequency, large repos (100GB+), snapshot-based testing Cost: ~$230+/month (1TB minimum) Build overhead: < 30 seconds (clone creation + small P4 delta sync)
Quick Comparison
| Approach | Monthly Cost | Storage Per Agent | Best Build Frequency |
|---|---|---|---|
| Ephemeral | $0 | 0 (wiped) | < 10/day |
| EFS | $5-30/agent | Full copy per agent | 10-100/day |
| NetApp | $230+ | Shared + thin deltas | 100+/day |
Recommendation: Start with ephemeral. Add EFS when builds exceed 10/day. Consider NetApp only at enterprise scale (50+ agents, 100GB+ repos).
Maintenance
Updating Components
# Update Terraform configuration
git pull

# Review changes
terraform plan

# Apply updates
terraform apply
Scaling
TeamCity Agents:
Edit locals.tf and modify teamcity_agent_count or enable auto-scaling.
Unity Accelerator:
Increase cache size by modifying unity_accelerator_cache_size_gb in locals.tf.
Perforce Storage: Extend EBS volume size through AWS Console or CLI, then resize filesystem.
Monitoring
Key metrics to monitor:
- TeamCity build queue depth and agent utilization
- Unity Accelerator cache hit rate
- Perforce disk usage and connection count
- S3 bucket size and request rates
- RDS CPU, memory, and connection count
Backup and Disaster Recovery
Perforce:
- Daily automated snapshots of EBS volumes
- RDS automated backups (7-day retention)
- Export metadata with
p4 admin checkpoint
TeamCity:
- RDS automated backups
- Configuration exported to S3 (manual)
S3 Artifacts:
- Versioning enabled
- Cross-region replication (optional)
Troubleshooting
Common Issues
Perforce connection refused:
- Check security group rules allow port 1666
- Verify P4 Server EC2 instance is running
- Check DNS resolution
TeamCity agents not connecting:
- Verify server URL in agent configuration
- Check security groups allow agent-to-server communication
- Review agent logs in CloudWatch
Unity Accelerator not caching:
- Verify Unity Editor configuration
- Check accelerator logs for errors
- Ensure port 10080 is accessible
License server not responding:
- Verify EC2 instance is running
- Check license file validity
- Review license server logs
Logs
All services log to CloudWatch Logs:
# View Perforce logs
aws logs tail /ecs/perforce-server --follow

# View TeamCity logs
aws logs tail /ecs/teamcity-server --follow

# View Unity Accelerator logs
aws logs tail /ecs/unity-accelerator --follow
Cleanup
To destroy all resources:
# Destroy all Terraform-managed resources
terraform destroy
Note: This will NOT delete:
- AMIs created with Packer
- Route53 hosted zone
- Manual secrets in Secrets Manager
- EBS snapshots (if retention configured)
Delete these manually if needed.
Security Considerations
Secrets Management
- Never commit credentials to Git
- Rotate secrets regularly
- Use AWS Secrets Manager for all credentials
- Enable audit logging for secret access
Network Security
- Deploy in private subnets
- Use security groups for least privilege access
- Enable VPC Flow Logs for traffic analysis
- Consider AWS PrivateLink for service endpoints
Access Control
- Use IAM roles instead of access keys
- Enable MFA for administrative access
- Implement least privilege principle
- Configure Perforce user permissions with protections table
Compliance
- Enable CloudTrail for audit logging
- Use AWS Config for compliance monitoring
- Encrypt all data at rest
- Implement backup and retention policies
Support and Resources
- CGD Toolkit Documentation: https://aws-games.github.io/cloud-game-development-toolkit/
- Report Issues: https://github.com/aws-games/cloud-game-development-toolkit/issues
- Discussions: https://github.com/aws-games/cloud-game-development-toolkit/discussions
- Perforce Documentation: https://www.perforce.com/manuals/p4sag/
- TeamCity Documentation: https://www.jetbrains.com/help/teamcity/
- Unity Documentation: https://docs.unity3d.com/
License
This sample is part of the Cloud Game Development Toolkit and is licensed under MIT-0. See LICENSE for details.
Built for game developers, by game developers 🎮
Requirements
| Name | Version |
|---|---|
| terraform | >= 1.0 |
| aws | 6.6.0 |
| http | 3.5.0 |
| netapp-ontap | 2.3.0 |
Providers
| Name | Version |
|---|---|
| aws | 6.6.0 |
| http | 3.5.0 |
Modules
| Name | Source | Version |
|---|---|---|
| perforce | ../../modules/perforce | n/a |
| teamcity | ../../modules/teamcity | n/a |
| unity_accelerator | ../../modules/unity/accelerator | n/a |
| unity_license_server | ../../modules/unity/floating-license-server | n/a |
Resources
Inputs
| Name | Description | Type | Default | Required |
|---|---|---|---|---|
| route53_public_hosted_zone_name | The fully qualified domain name of your existing Route53 Hosted Zone (e.g., 'example.com'). | string |
n/a | yes |
| unity_license_server_file_path | Local path to the Linux version of the Unity Floating License Server zip file. Download from Unity ID portal at https://id.unity.com/. Set to null to skip Unity License Server deployment. | string |
null |
no |
| unity_teamcity_agent_image | Container image URI for Unity TeamCity build agents. Must include Unity Hub and Unity Editor. Build your own using the Dockerfile in docker/teamcity-unity-build-agent/, or set to null to skip Unity agent deployment. | string |
null |
no |
Outputs
| Name | Description |
|---|---|
| ecs_cluster_name | The name of the shared ECS cluster |
| p4_server_connection_string | The connection string for the P4 Server. Set your P4PORT environment variable to this value. |
| p4_swarm_url | The URL for the P4 Swarm (Code Review) service. |
| perforce_super_user_password_secret_arn | ARN of the secret containing Perforce super user password |
| perforce_super_user_username_secret_arn | ARN of the secret containing Perforce super user username |
| teamcity_url | The URL for the TeamCity server. |
| unity_accelerator_dashboard_password_secret_arn | ARN of the secret containing Unity Accelerator dashboard password |
| unity_accelerator_dashboard_username_secret_arn | ARN of the secret containing Unity Accelerator dashboard username |
| unity_accelerator_url | The URL for the Unity Accelerator dashboard. |
| unity_license_server_dashboard_password_secret_arn | ARN of the secret containing Unity License Server dashboard password (if deployed) |
| unity_license_server_registration_request_url | Presigned URL for downloading the server-registration-request.xml file (valid for 1 hour, if deployed) |
| unity_license_server_services_config_url | Presigned URL for downloading the services-config.json file (valid for 1 hour, if deployed) |
| unity_license_server_url | The URL for the Unity License Server dashboard (if deployed). |
Requirements
| Name | Version |
|---|---|
| terraform | >= 1.0 |
| aws | 6.6.0 |
| http | 3.5.0 |
| netapp-ontap | 2.3.0 |
Providers
| Name | Version |
|---|---|
| aws | 6.6.0 |
| http | 3.5.0 |
Modules
| Name | Source | Version |
|---|---|---|
| perforce | ../../modules/perforce | n/a |
| teamcity | ../../modules/teamcity | n/a |
| unity_accelerator | ../../modules/unity/accelerator | n/a |
| unity_license_server | ../../modules/unity/floating-license-server | n/a |
Resources
Inputs
| Name | Description | Type | Default | Required |
|---|---|---|---|---|
| route53_public_hosted_zone_name | The fully qualified domain name of your existing Route53 Hosted Zone (e.g., 'example.com'). | string |
n/a | yes |
| unity_license_server_file_path | Local path to the Linux version of the Unity Floating License Server zip file. Download from Unity ID portal at https://id.unity.com/. Set to null to skip Unity License Server deployment. | string |
null |
no |
| unity_teamcity_agent_image | Container image URI for Unity TeamCity build agents. Must include Unity Hub and Unity Editor. Build your own using the Dockerfile in docker/teamcity-unity-build-agent/, or set to null to skip Unity agent deployment. | string |
null |
no |
Outputs
| Name | Description |
|---|---|
| ecs_cluster_name | The name of the shared ECS cluster |
| p4_server_connection_string | The connection string for the P4 Server. Set your P4PORT environment variable to this value. |
| p4_swarm_url | The URL for the P4 Swarm (Code Review) service. |
| perforce_admin_password_secret_arn | ARN of the secret containing Perforce admin password |
| perforce_admin_username_secret_arn | ARN of the secret containing Perforce admin username |
| perforce_super_user_password_secret_arn | ARN of the secret containing Perforce super user password |
| teamcity_url | The URL for the TeamCity server. |
| unity_accelerator_dashboard_password_secret_arn | ARN of the secret containing Unity Accelerator dashboard password |
| unity_accelerator_dashboard_username_secret_arn | ARN of the secret containing Unity Accelerator dashboard username |
| unity_accelerator_url | The URL for the Unity Accelerator dashboard. |
| unity_license_server_dashboard_password_secret_arn | ARN of the secret containing Unity License Server dashboard password (if deployed) |
| unity_license_server_registration_request_url | Presigned URL for downloading the server-registration-request.xml file (valid for 1 hour, if deployed) |
| unity_license_server_services_config_url | Presigned URL for downloading the services-config.json file (valid for 1 hour, if deployed) |
| unity_license_server_url | The URL for the Unity License Server dashboard (if deployed). |